
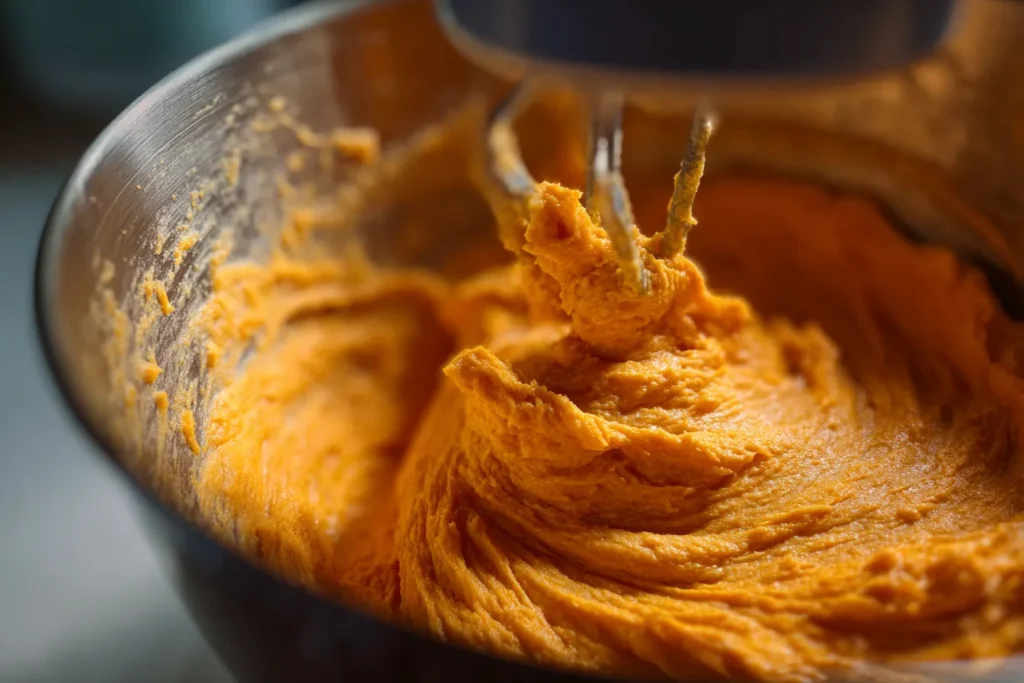
Step 1: Mix the Cheesecake Filling (5 minutes)
In a large bowl, beat cream cheese, pumpkin puree, vanilla extract, pumpkin pie spice, and cinnamon until the mixture becomes smooth and creamy. This is where the magic begins — your kitchen will start smelling like a cozy autumn bakery!
Make sure the cream cheese is soft; otherwise, you’ll get lumps instead of a velvety texture. Use a hand mixer or stand mixer on medium speed for about 2–3 minutes.
Step 2: Add the Dry Ingredients (5 minutes)
Gradually add powdered sugar and graham cracker crumbs, mixing slowly to combine. The texture should shift from runny to thick and scoopable — similar to cookie dough.
If the mixture feels too sticky, add an extra tablespoon or two of graham crumbs. If it’s too firm, add a teaspoon of pumpkin puree at a time until soft but shapeable.
You want a dough that easily forms into balls without sticking to your hands.
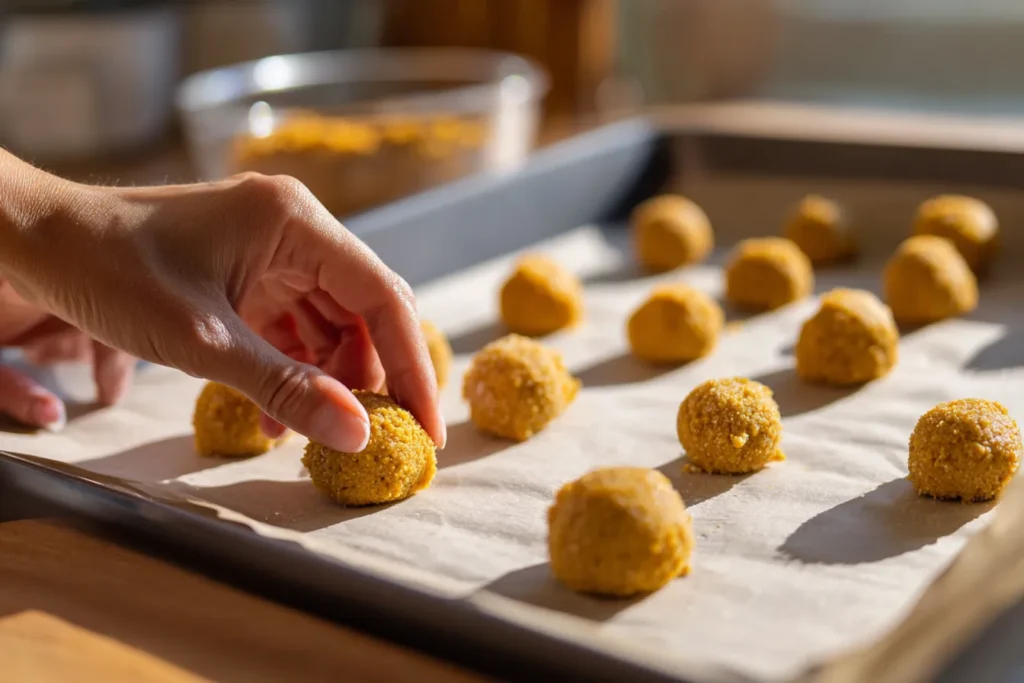
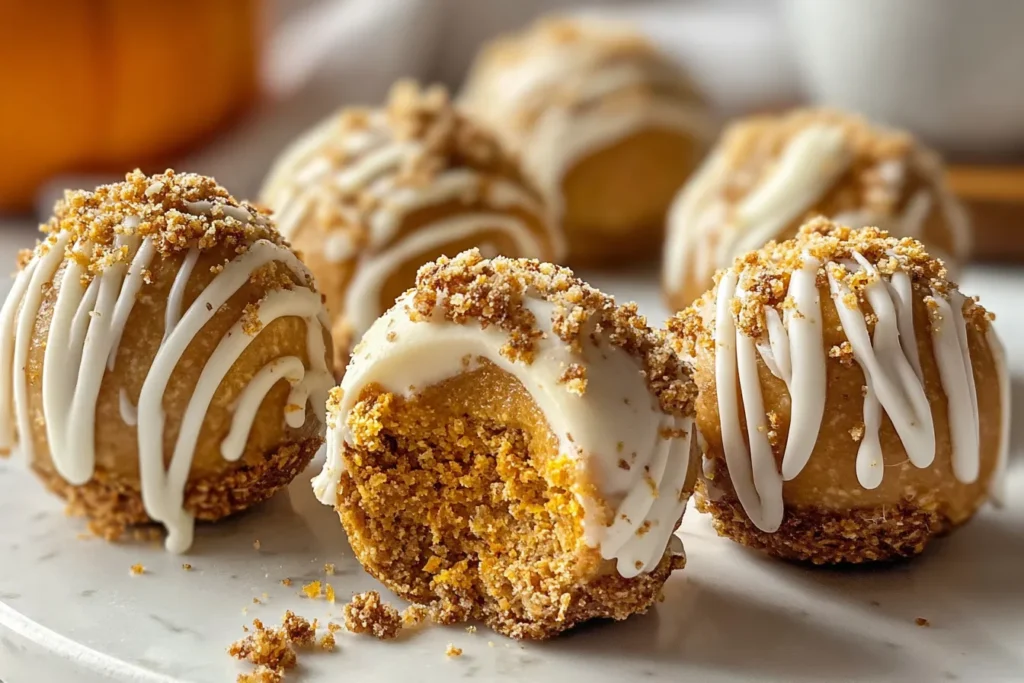
Step 3: Shape the Balls (10 minutes)
Using a small cookie scoop or spoon, portion the dough and roll it between your palms into smooth, bite-sized balls. Aim for about 1 inch in diameter — roughly the size of a truffle or large marble.
Place them on a parchment-lined baking sheet. Once all the balls are formed, pop the tray into the refrigerator for 1–2 hours. This chilling time allows them to firm up and hold their shape.
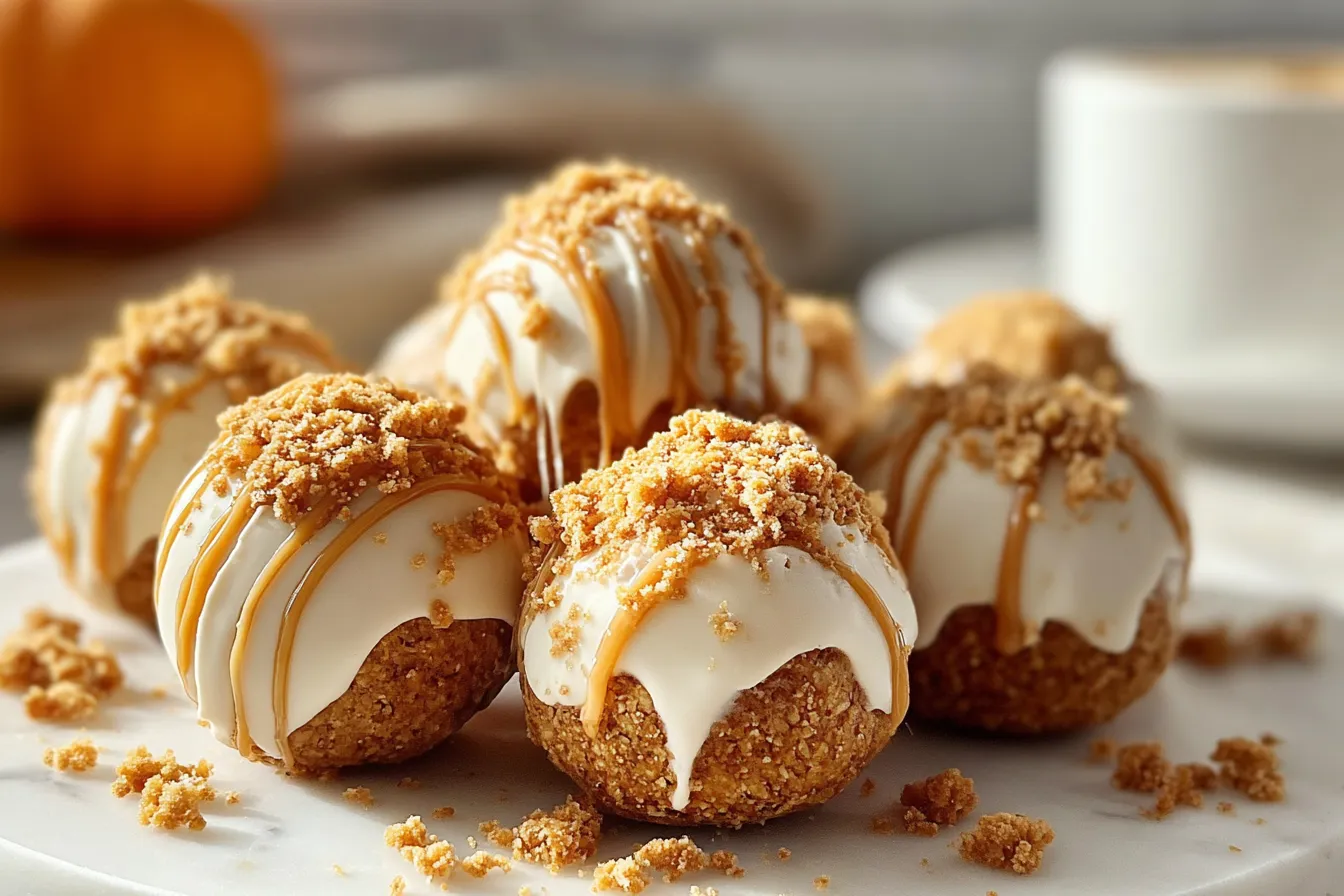
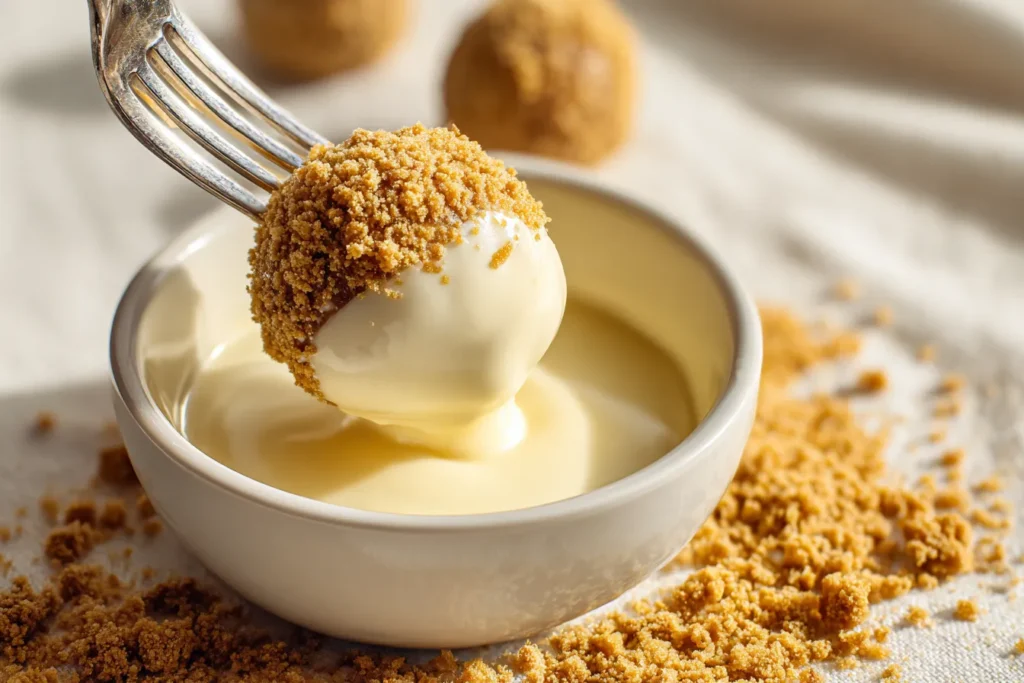
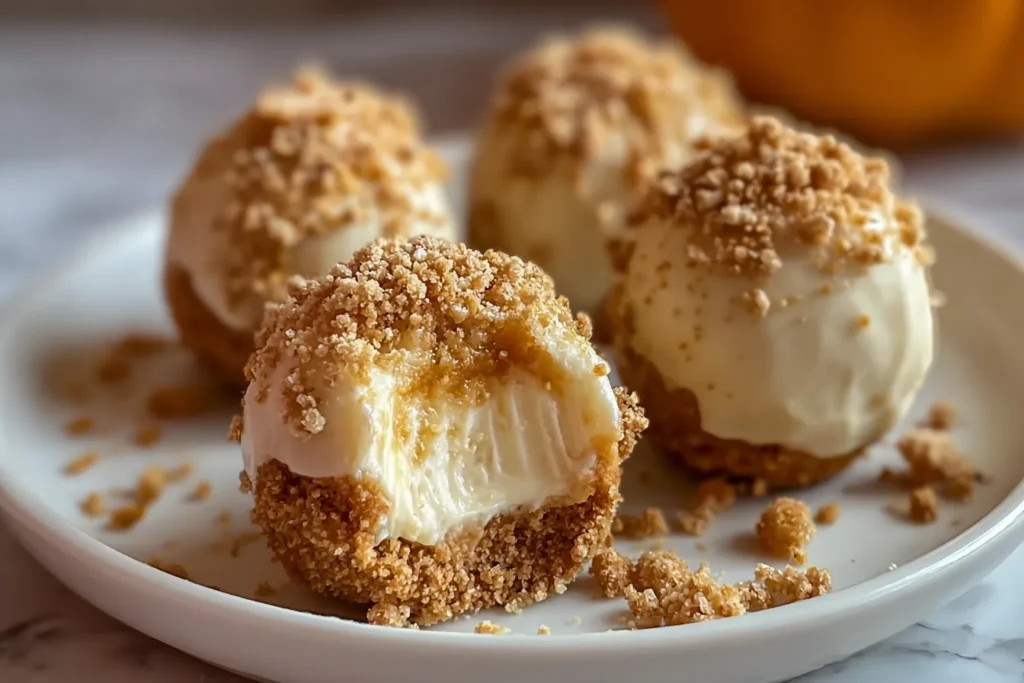
Step 4: Coat the Balls (10 minutes)
Now it’s time to get creative!
You can:
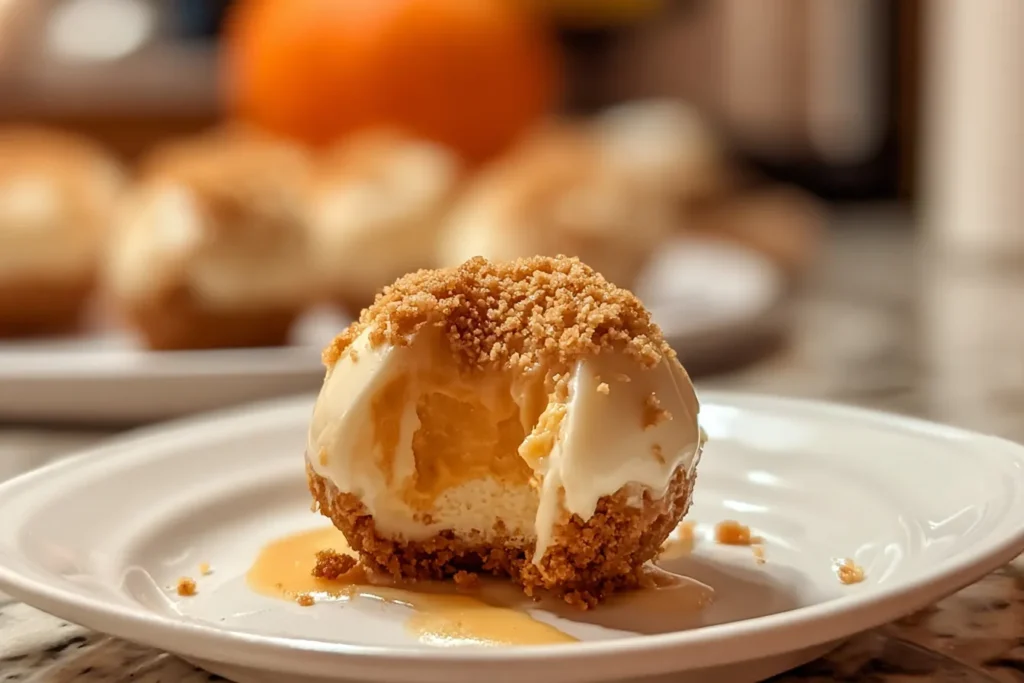
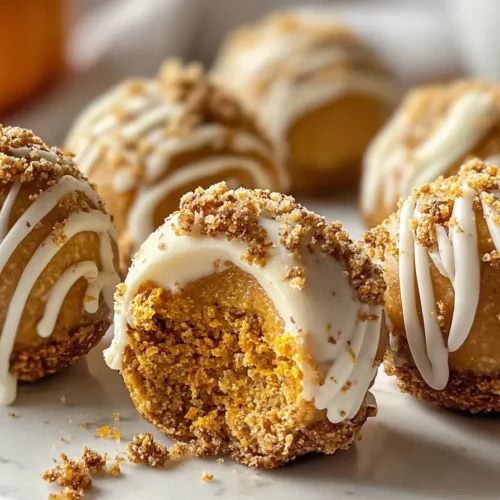
- Roll them in graham cracker crumbs for a rustic, pumpkin-pie-like finish.
- Dip them in melted white chocolate or candy melts for a glossy, professional look.
- Drizzle dark or milk chocolate across the tops for a gourmet touch.
If dipping in chocolate, melt it in 20-second intervals in the microwave, stirring in between until smooth. Use a fork to lower each ball into the chocolate, tap off the excess, and set them back on parchment to harden.
Step 5: Chill Again (30 minutes)
After coating, refrigerate the cheesecake balls for another 30 minutes to let the coatings set completely. This final chill ensures the perfect texture — firm on the outside, creamy inside.
Once set, transfer them to an airtight container and store in the fridge until ready to serve.
Expert Tips for Perfect Texture and Flavor
To achieve that “wow, these are amazing!” reaction every single time, it’s all about nailing the texture and balance of flavors. Here are some expert tips to help you get it just right:
- Use Full-Fat Cream Cheese:
Light cream cheese might seem like a healthy option, but it changes the consistency. Full-fat gives you that luxurious, creamy texture that holds its shape after chilling. - Don’t Overmix:
Once you add the dry ingredients, mix only until combined. Overmixing can cause the filling to become too loose and sticky. - Chill Between Steps:
Chilling twice — once before coating and once after — is the secret to firm, scoopable truffles that don’t collapse or get messy. - Balance the Sweetness:
If you prefer less sweetness, start with 1½ cups of powdered sugar and adjust to taste. Remember, if you’re coating them in white chocolate, you’ll be adding sweetness there too. - Add a Pinch of Salt:
Just a touch of fine sea salt can elevate the overall flavor and balance the sweetness. - Avoid Pumpkin Pie Filling:
Always check the can label — pure pumpkin puree only! Pumpkin pie filling already has sugar and spices added, which can make your mixture too soft and overly sweet. - Adjust the Spice Level:
Love cinnamon? Add a little extra. Want more warmth? Add a pinch of nutmeg or ginger. This recipe is flexible enough to match your spice preference. - For a Firmer Texture:
Add a tablespoon or two of crushed graham crackers or even finely ground oats to firm up the dough if it feels too loose.
These little details make a huge difference. With the right texture and perfect balance of pumpkin, spice, and creaminess, your cheesecake balls will taste just like a bakery treat!
Creative Coating Ideas – Beyond White Chocolate
Sure, classic white chocolate-dipped pumpkin cheesecake balls look gorgeous and taste divine, but why stop there? You can take these treats to a whole new level of creativity and flavor with different coatings. Here are some fun ideas:

1. Graham Cracker Classic
Roll each ball in crushed graham crackers for that nostalgic pumpkin pie crust flavor. It’s simple, cozy, and perfectly complements the pumpkin filling.
2. Cinnamon Sugar Sprinkle
Combine 2 tablespoons of granulated sugar with ½ teaspoon of cinnamon and roll the chilled balls in this mixture. The result? A sweet, crunchy coating that sparkles and tastes like fall!
3. Crushed Pecans or Walnuts
Add some nutty texture by rolling the balls in finely chopped nuts. Toast them lightly beforehand for a rich, caramelized crunch.
4. Coconut Flakes
Want a tropical twist? Coat the balls in sweetened shredded coconut. The flavor pairs beautifully with pumpkin and adds visual appeal.
5. Dark Chocolate Drizzle
If white chocolate feels too sweet, drizzle melted dark chocolate over the graham-rolled balls. It gives them a sophisticated, café-style finish.
6. Pumpkin Spice Cocoa Dust
Mix a bit of cocoa powder with pumpkin pie spice and dust it lightly over the top using a small sieve. The bitter cocoa balances the sweetness, making every bite more indulgent.
Flavor Variations to Try This Season
The beauty of this recipe is how adaptable it is. Once you master the base version, you can customize it for any occasion or craving. Here are some must-try variations:
1. Pumpkin Cheesecake Bites with Maple Glaze
Add 1 tablespoon of pure maple syrup to the filling for a rich, autumnal sweetness. Then drizzle extra syrup or maple glaze on top after coating. Perfect for cozy brunches!
2. Chocolate Pumpkin Cheesecake Balls
Mix in 2 tablespoons of cocoa powder to the filling before rolling. Dip in dark chocolate and sprinkle a bit of sea salt on top for an elegant, decadent twist.
3. Pumpkin Spice Latte Balls
Add ½ teaspoon of instant espresso powder to the mixture for a coffee kick that pairs beautifully with the pumpkin spice flavor.
4. Caramel Swirl Pumpkin Cheesecake Balls
Swirl a tablespoon of caramel sauce into the mixture just before shaping. Then drizzle with more caramel after dipping in chocolate — a caramel lover’s dream!
5. Ginger Snap Coating
Instead of graham crumbs, use crushed gingersnap cookies for a spicier, crunchier coating. It’s bold, flavorful, and adds extra autumn warmth.
6. Nutella Pumpkin Cheesecake Balls
Mix 2 tablespoons of Nutella into the filling for a creamy, chocolate-hazelnut surprise. Dip in milk chocolate and garnish with crushed hazelnuts.
Each variation adds its own personality to the recipe — you can make a platter of assorted flavors and impress everyone at your next get-together!
Storage and Shelf Life – Keep Them Fresh and Creamy
These cheesecake balls are not only delicious but also very storage-friendly. Whether you’re prepping for a party or saving some for later, here’s how to keep them in perfect condition:
- In the Refrigerator:
Store them in an airtight container for up to 5 days. Place parchment paper between layers to prevent sticking. - In the Freezer:
Freeze the undipped cheesecake balls on a baking sheet first, then transfer them to a zip-top freezer bag. They’ll stay fresh for up to 2 months. When ready to serve, thaw in the fridge overnight. If you’ve dipped them in chocolate, don’t microwave — the coating may crack. - Avoid Room Temperature Storage:
Because of the cream cheese and pumpkin, these should always be stored cold. Keep them refrigerated until serving.
Pro Tip: If you’re planning a big event, make these ahead, freeze them, and coat them in chocolate the day before. It saves time and guarantees freshness.
Serving Suggestions – How to Present Like a Pro
Presentation is everything, especially with bite-sized desserts. Luckily, these pumpkin cheesecake balls are naturally photogenic — but with a few styling tricks, you can make them look straight out of a bakery window.
1. Autumn Dessert Board
Arrange your cheesecake balls alongside caramel apples, cinnamon sticks, chocolate truffles, and mini cookies. Add fall leaves or pumpkin décor for extra flair.
2. Edible Gift Boxes
Place 6–8 cheesecake balls in a small treat box or mason jar, tie a ribbon around it, and add a cute tag that says “Pumpkin Kisses & Cheesecake Wishes.” They make the perfect homemade gift.
3. Holiday Party Platters
Serve them on a tiered dessert stand or a wooden charcuterie board. Drizzle some caramel or chocolate on the tray for added appeal.
4. Individual Treat Cups
Pop one or two balls in mini cupcake liners and set them in clear plastic cups — ideal for buffets and gatherings.
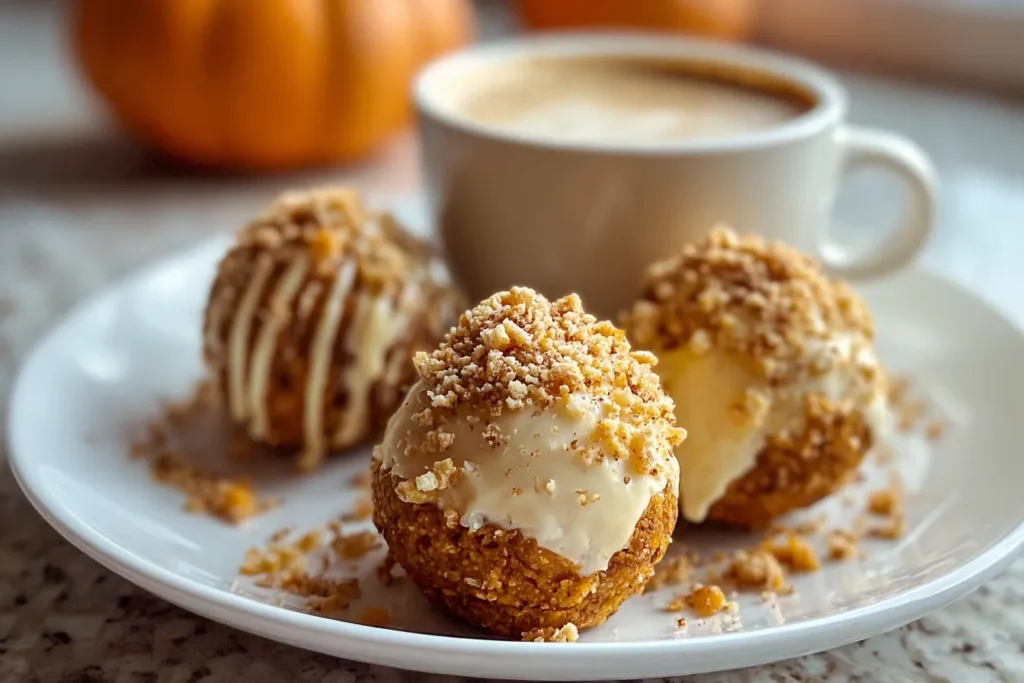
5. Café-Style Pairing
Serve your pumpkin cheesecake balls with a steaming latte, chai tea, or even mulled cider for the ultimate cozy combo.
No matter how you serve them, these treats always steal the spotlight — small in size, big in flavor, and absolutely stunning to look at!
Why Pumpkin and Cheesecake Are a Match Made in Dessert Heaven
Pumpkin and cheesecake share a natural harmony that makes them irresistible together. Cheesecake’s tangy creaminess complements the earthy sweetness of pumpkin perfectly. Add a touch of warm spice, and you’ve got a dessert that feels like fall itself.
- The cream cheese adds richness.
- The pumpkin puree brings moisture and natural sweetness.
- The spices—cinnamon, nutmeg, ginger—create that nostalgic flavor we all crave in autumn.
It’s this balance of creamy, spicy, and slightly tangy that makes pumpkin cheesecake one of the most beloved desserts of the season — and these no-bake balls capture it all in one perfect bite.
Make-Ahead and Freezer-Friendly Instructions
One of the best things about No-Bake Pumpkin Cheesecake Balls is how easy they are to prepare in advance. Whether you’re planning for a holiday party, a cozy fall movie night, or just want a sweet treat on hand all week long, this recipe fits perfectly into your schedule.
Here’s how to make them ahead without losing that creamy, dreamy texture:
Make-Ahead Tips
- Prepare the Filling Early:
You can mix the cream cheese, pumpkin puree, spices, and other ingredients up to two days in advance. Store the mixture in a sealed container in the refrigerator until ready to roll into balls. - Form and Chill:
Roll the balls and refrigerate for 1–2 hours to firm them up. Once set, you can store them in the fridge for up to five days before coating. - Dip or Roll Before Serving:
For the freshest presentation, dip the cheesecake balls in melted chocolate or roll them in graham crumbs on the same day you plan to serve them. The coating will stay crisp and beautiful.
Freezer Tips
- Freezing Uncoated Balls:
Arrange the rolled cheesecake balls on a parchment-lined baking sheet and freeze for 1–2 hours. Once solid, transfer them to a freezer-safe bag or container. This method prevents them from sticking together. - Freezing Coated Balls:
If they’re already dipped in chocolate, place a piece of wax paper between each layer to protect the coating. They’ll last beautifully in the freezer for up to 2 months. - Thawing:
Move them from the freezer to the refrigerator the night before serving. Avoid thawing at room temperature — it can cause condensation, making the coating sticky. - Quick Trick:
Frozen cheesecake balls are incredible as a cold treat! They taste like pumpkin ice cream truffles — rich, cool, and melt-in-your-mouth delicious.
With these make-ahead options, you can always have a stash of fall bliss waiting in your fridge or freezer.
Troubleshooting: Fixing Common Mistakes
Even though this recipe is simple, a few hiccups can happen — especially the first time you try it. Here’s how to troubleshoot the most common issues with no-bake cheesecake balls like a pro:
1. The Mixture Is Too Sticky
If your filling sticks to your hands and refuses to roll, it’s likely too wet.
Fix: Add more graham cracker crumbs, one tablespoon at a time, until the mixture firms up.
2. The Balls Are Too Dry or Crumbly
This usually means you’ve added too many dry ingredients.
Fix: Mix in 1–2 teaspoons of pumpkin puree or a small spoon of softened cream cheese until smooth again.
3. The Balls Aren’t Firming Up
If they’re too soft after chilling, make sure your fridge is cold enough and that you’ve chilled them for at least 1 hour.
Pro Tip: Place them in the freezer for 20 minutes for a quick fix.
4. The Chocolate Coating Cracks
Cracks happen when cold cheesecake balls are dipped into hot melted chocolate.
Fix: Let the balls sit at room temperature for 5 minutes before dipping, and ensure the chocolate is warm but not too hot.
5. Chocolate Won’t Stick to the Balls
This can occur if there’s too much moisture on the surface.
Fix: Pat the chilled cheesecake balls dry with a paper towel before dipping.
6. The Coating Is Too Thick
If the chocolate feels too heavy or clumpy, stir in a small amount of coconut oil or vegetable shortening to thin it out. This creates a smoother finish.
Don’t worry — even if they’re not picture-perfect, these pumpkin cheesecake balls always taste heavenly. Remember: homemade charm beats perfection every time!
No-Bake Pumpkin Cheesecake Balls
Equipment
- Mixing Bowl
- Hand mixer
- Baking Sheet
Ingredients
Cheesecake Filling
- 8 oz cream cheese softened
- 1 cup pumpkin puree
- 1 tsp vanilla extract
- 1 tsp pumpkin pie spice
- 1/2 tsp cinnamon
Dry Ingredients
- 2 cups powdered sugar
- 1.5 cups graham cracker crumbs plus extra for rolling
- white chocolate or candy melts optional, for dipping
Instructions
- Mix the Cheesecake Filling (5 mins): In a large bowl, beat together cream cheese, pumpkin puree, vanilla extract, pumpkin pie spice, and cinnamon until smooth and creamy.
- Add the Dry Ingredients (5 mins): Gradually mix in powdered sugar and graham cracker crumbs until fully combined. The mixture should be thick and firm enough to roll into balls.
- Shape the Balls (10 mins): Roll the mixture into small bite-sized balls. Place them on a lined baking sheet and refrigerate for 1–2 hours to firm up.
- Coat the Balls (10 mins): Once chilled, roll each ball in extra graham cracker crumbs or dip in melted white chocolate for a decadent coating.
- Chill Again (30 mins): Return the coated balls to the fridge for another 30 minutes to set completely.
- Serve & Enjoy: Serve chilled and enjoy these dreamy little bites of pumpkin cheesecake perfection!
Notes
Similar recipes :
Pumpkin Cinnamon Crumble Cookies
Flourless Pumpkin Muffins – A Cozy Fall Favorite
Nutritional Breakdown and Portion Guide
Before you dive into your second (or third!) cheesecake ball, let’s take a quick look at the nutrition facts. These numbers are approximate and depend on coating choices (white chocolate vs. graham crumbs, etc.).
| Nutritional Element | Per Cheesecake Ball (1 piece) |
|---|---|
| Calories | ~150 kcal |
| Total Fat | 7g |
| Saturated Fat | 4g |
| Carbohydrates | 18g |
| Sugar | 14g |
| Protein | 2g |
| Fiber | 0.5g |
| Sodium | 60mg |
Each batch makes about 20–24 cheesecake balls, depending on size.
Healthy Tweaks You Can Try
- Use reduced-fat cream cheese for a lighter option (though texture may soften slightly).
- Substitute half of the powdered sugar with coconut sugar or stevia for reduced sweetness.
- Roll in crushed oats or almonds instead of graham crackers for extra fiber.
- For a dairy-free version, use vegan cream cheese and dairy-free chocolate chips.
These tweaks let you enjoy this indulgent fall dessert guilt-free — perfect for anyone balancing flavor with mindful eating.
Conclusion – A Cozy, Creamy Fall Treat You’ll Make Again and Again
When it comes to easy fall desserts, nothing beats the charm of No-Bake Pumpkin Cheesecake Balls. They combine everything we love about pumpkin pie and cheesecake — rich, creamy, spiced, and totally irresistible — but in a format that’s quick, simple, and stress-free.
Every bite tastes like a cozy autumn hug: smooth cream cheese, the sweetness of pumpkin, and that familiar cinnamon spice that instantly warms your heart. Whether you coat them in graham crumbs or dip them in glossy white chocolate, they’ll always be a crowd favorite.
So the next time pumpkin season rolls around, skip the oven and grab a bowl. Whip up these no-bake beauties, chill them, and enjoy pure pumpkin bliss — one creamy bite at a time. 🎃🧡
You may read also :
Old-Fashioned Pumpkin Bars with Cream Cheese Frosting
Pumpkin Spice Gooey Cake: A Cozy Autumn Dessert
Autumn Pumpkin Spice Crumble Cake
FAQs – Answering Your Pumpkin Cheesecake Ball Questions
1. Can I use homemade pumpkin puree instead of canned?
Absolutely! Homemade pumpkin puree works perfectly as long as it’s well-drained. Too much liquid can make the mixture too soft.
2. What’s the best chocolate for dipping?
Use high-quality white chocolate or candy melts for the smoothest coating. Add a teaspoon of coconut oil for extra shine and easier dipping.
3. Can I make these without graham crackers?
Yes! Substitute with vanilla wafers, gingersnaps, or Biscoff cookies for a flavorful twist.
4. How far in advance can I make them?
You can make them up to 5 days ahead and store in the fridge, or freeze for up to 2 months. They taste even better after a day of chilling!
5. How do I prevent the chocolate from melting during transport?
Keep them refrigerated until the last minute, and if you’re traveling, use a cooler bag with ice packs to maintain temperature.