Easy Apple Crisp Bars 🍎– A Cozy Dessert You’ll Want to Make Again and Again

If you love apple crisp but want something that’s portable, shareable, and just as comforting, these Easy Apple Crisp Bars are the answer. With a buttery oat crust, a tender apple filling, and a golden crumb topping, these bars deliver everything you love about apple crisp—only in neat, handheld squares.

They’re perfect for fall baking, holiday gatherings, bake sales, or just a sweet treat to enjoy with coffee or tea. The best part? They’re incredibly simple to make with pantry-friendly ingredients and a handful of fresh apples.

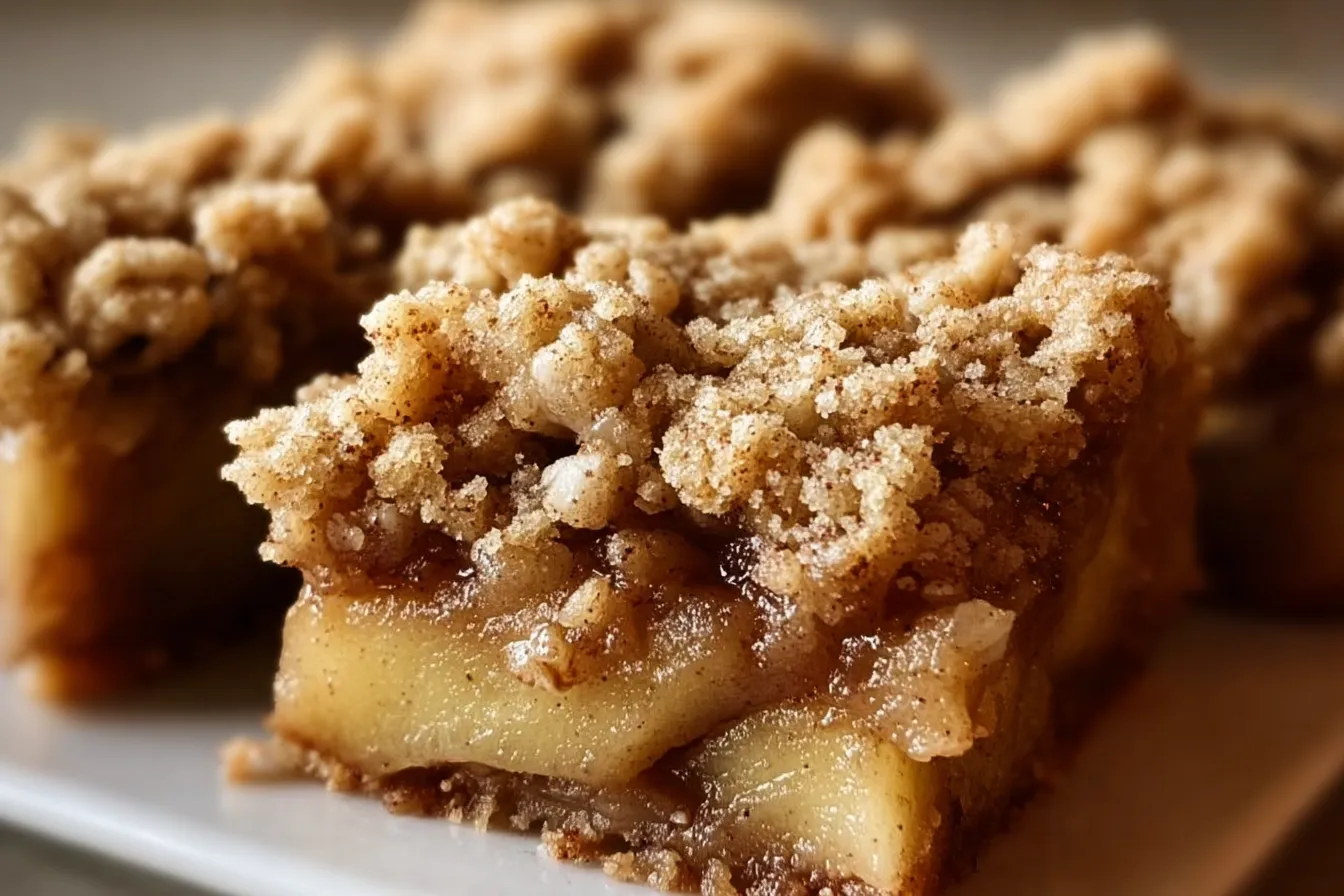
Introduction to Apple Crisp Bars

Apple crisp has long been one of the most beloved fall desserts. There’s just something magical about tender apples baked with cinnamon and sugar under a buttery, crunchy oat topping. But what if you could take all that cozy goodness and make it portable? That’s where Apple Crisp Bars come in.

These bars transform the traditional apple crisp into a dessert you can slice, serve, and even wrap up for lunchboxes or bake sales. They’re sturdy enough to hold in your hand, but still have all the flavor of a warm apple crisp straight out of the oven.

The buttery oat crust doubles as the topping, creating layers of texture and flavor. In the middle, juicy apples tossed in sugar and lemon bake down into a tender, sweet-tart filling. Once cooled and cut into squares, you’ve got a dessert that’s as easy to serve as it is to eat.

It’s comfort food meets convenience—and once you try them, you’ll be hooked.

Ingredients You’ll Need

Let’s start with what you’ll need to make these irresistible bars.

For the Crust & Topping:

  • 2 cups all-purpose flour – The base that holds everything together.
  • 1 cup rolled oats – Gives that classic crisp texture.
  • 1 cup brown sugar, packed – Adds sweetness and a caramel-like depth.
  • 1 teaspoon ground cinnamon – Warm spice to complement the apples.
  • ½ teaspoon baking soda – Helps with texture.
  • ÂĽ teaspoon salt – Balances the sweetness.
  • 1 cup unsalted butter, melted – Richness and moisture to bring the crust together.

For the Apple Filling:

  • 4 cups peeled and chopped apples (about 4 medium apples) – The star of the show.
  • ÂĽ cup granulated sugar – Sweetens the apples.
  • 1 tablespoon lemon juice – Keeps the apples from browning and adds brightness.

Ingredient Notes & Swaps

  • Apples – Use a mix of tart and sweet apples for balance (Granny Smith + Honeycrisp is a winning combo).
  • Oats – Old-fashioned rolled oats give the best texture. Avoid instant oats, which can make the topping mushy.
  • Butter – If you only have salted butter, reduce the added salt by half.
  • Sugar – Adjust the granulated sugar in the filling based on how sweet your apples are.
  • Add-ins – Chopped pecans, walnuts, or a sprinkle of nutmeg in the crumb mixture take these bars to the next level.

Step-by-Step Instructions

Now, let’s walk through how to make these bars, step by step.

1. Prepare the Pan

Preheat your oven to 350°F (175°C). Grease a 9×13-inch baking pan or line it with parchment paper for easy removal. Parchment is a game changer if you want neat, clean squares.

2. Make the Crust & Crumb Topping

In a large mixing bowl, combine:

  • Flour
  • Oats
  • Brown sugar
  • Cinnamon
  • Baking soda
  • Salt

Stir in the melted butter until the mixture looks crumbly and evenly moistened.

👉 Here’s the magic: this mixture serves as both the crust and the topping. You’ll press some into the pan, and save the rest for sprinkling on top.

3. Press the Crust

Take about two-thirds of the crumb mixture and press it firmly into the bottom of your prepared pan. This forms the base that will hold the apples. Make sure it’s even and well-packed—this helps the bars stay sturdy when sliced.

4. Prepare the Apple Filling

In another bowl, toss together:

  • Peeled, chopped apples
  • Granulated sugar
  • Lemon juice

The sugar enhances the natural sweetness, while the lemon juice keeps the apples bright and balances the flavors.

5. Layer the Bars

Spread the apple mixture evenly over the crust. Then sprinkle the remaining crumb mixture on top, making sure to cover the apples as much as possible. This creates that irresistible crisp topping.

6. Bake to Perfection

Bake for 40–45 minutes, or until the top is golden brown and the apples are tender. The smell of cinnamon and apples baking will make your kitchen smell like fall itself.

7. Cool & Slice

Let the bars cool completely in the pan before cutting. This is the hardest part—you’ll be tempted to dig in right away, but cooling allows the layers to set and makes slicing easier.

Once cooled, cut into neat squares and serve.

Tips for the Best Apple Crisp Bars

Even though this recipe is simple, there are a few little tricks to make your bars turn out bakery-worthy every single time.

1. Choosing the Right Apples

Apples are the heart of this recipe, so choose wisely. The best bars use a mix of tart and sweet apples:

  • Tart apples like Granny Smith or Braeburn hold their shape during baking and balance the sweetness.
  • Sweet apples like Honeycrisp, Fuji, or Gala add juicy flavor.

Using a combination gives you the perfect balance of flavors and textures.

2. Don’t Skip the Lemon Juice

A little splash of lemon juice brightens up the apples and prevents them from turning brown before baking. It also adds just enough acidity to balance the richness of the crust and topping.

3. Press the Crust Firmly

When pressing the bottom layer into the pan, make sure it’s even and compact. If it’s too loose, your bars might crumble when sliced. Using the back of a measuring cup is an easy way to get a smooth, packed crust.

4. Adjust Sweetness to Taste

If your apples are naturally very sweet, you can cut back on the added granulated sugar. On the other hand, if you’re using very tart apples, you may want to add a bit more. Taste a slice before mixing so you know where to adjust.

5. Add a Crunchy Twist

Love texture? Stir some chopped walnuts, pecans, or even almonds into the crumb mixture before baking. The extra crunch pairs beautifully with the tender apples.

You may read as well :

Apple Snickerdoodle Dump Cake – A Cozy Cinnamon-Sweet Delight

Caramel Apple Cupcakes

Easy Apple Crisp Bars

Easy Apple Crisp Bars

These Easy Apple Crisp Bars are the perfect handheld version of a classic fall dessert! A buttery oat crust, spiced apples, and crumbly topping make them a cozy treat for any occasion. 🍎🍂
Prep Time 20 minutes
Cook Time 45 minutes
Cooling Time 30 minutes
Total Time 1 hour 5 minutes
Course Dessert
Cuisine American
Servings 16 bars
Calories 310 kcal

Equipment

  • 9×13-inch Baking Pan
  • Mixing Bowls
  • Spatula

Ingredients
  

Crust & Topping

  • 2 cups all-purpose flour
  • 1 cup rolled oats
  • 1 cup brown sugar packed
  • 1 tsp ground cinnamon
  • 1/2 tsp baking soda
  • 1/4 tsp salt
  • 1 cup unsalted butter melted

Apple Filling

  • 4 cups apples peeled and chopped (about 4 medium apples)
  • 1/4 cup granulated sugar
  • 1 tbsp lemon juice

Instructions
 

  • Preheat oven to 350°F (175°C). Grease a 9×13-inch baking pan.
  • In a large bowl, combine flour, oats, brown sugar, cinnamon, baking soda, and salt. Stir in melted butter until mixture is crumbly.
  • Press about two-thirds of the crumb mixture into the bottom of the pan to form the crust.
  • In another bowl, toss chopped apples with granulated sugar and lemon juice. Spread evenly over the crust layer.
  • Sprinkle the remaining crumb mixture over the apples.
  • Bake for 40–45 minutes, until the top is golden brown and the apples are tender.
  • Cool completely in the pan before cutting into squares.

Notes

For added flavor, mix in chopped nuts (walnuts or pecans) with the crumb mixture or apple filling. For a sweeter treat, add more sugar to the apple mixture or drizzle with caramel sauce before serving.
Keyword Apple, Bars, Crisp, Fall Baking

Why Apple Desserts Are Timeless

Apple desserts have stood the test of time—and for good reason. They’re cozy, versatile, and nostalgic.

Think about it: apple pie, apple crisp, apple cake, caramel apples—apples have a way of making any dessert feel comforting and familiar. The aroma of apples baking with cinnamon instantly evokes feelings of fall, warmth, and family gatherings.

Apples also pair effortlessly with so many flavors:

  • Caramel for indulgence
  • Cinnamon & nutmeg for spice and warmth
  • Vanilla for a subtle sweetness
  • Nuts for crunch
  • Cheddar cheese (yes, really!) for a savory-sweet twist

Apple desserts also work year-round. In fall, they highlight harvest flavors. In winter, they bring coziness. In spring and summer, chilled apple treats feel refreshing. That’s why recipes like these Apple Crisp Bars never go out of style—they’re truly timeless.

You may like also this recipe : 5 Simple Steps to Perfect Slow Cooker Cracker Barrel Fried Apples

Storage & Make-Ahead Tips

One of the best things about Apple Crisp Bars is that they store beautifully, making them a fantastic make-ahead dessert.

  • Room Temperature: Store bars in an airtight container at room temperature for up to 2 days.
  • Refrigerator: For longer storage, refrigerate them for up to 5 days. They stay firm and flavorful.
  • Freezer: Wrap bars individually in plastic wrap, then place them in a freezer-safe bag or container. Freeze for up to 3 months. To serve, thaw overnight in the fridge.

👉 Pro tip: Warm bars taste incredible! Pop a slice in the microwave for about 10 seconds and top with a scoop of vanilla ice cream for a next-level treat.

Variations You’ll Love

Want to make this recipe your own? Try one of these fun twists:

  • Caramel Drizzle: Add a drizzle of caramel sauce over the baked bars for extra indulgence.
  • Nutty Delight: Mix in ½ cup chopped pecans or walnuts to the crumb topping for crunch.
  • Spiced Apple Bars: Add a pinch of nutmeg, cloves, or allspice to the apple filling for deeper flavor.
  • Apple Cranberry Bars: Stir in a handful of dried cranberries with the apples for a tangy-sweet combo.
  • Gluten-Free: Swap all-purpose flour for a gluten-free baking blend and make sure your oats are certified gluten-free.
  • Apple-Pear Mix: Replace half the apples with chopped pears for a slightly different fruit layer.

Check this one as well : Apple Spice Cake with Brown Sugar Frosting

Serving Suggestions

These bars are amazing all on their own, but here are some ways to take them to the next level:

  • With Ice Cream: Vanilla is classic, but cinnamon ice cream pairs beautifully with apples.
  • With Whipped Cream: A dollop of fresh whipped cream adds lightness.
  • Drizzled with Caramel or Maple Syrup: Makes them extra cozy.
  • For Breakfast: Believe it or not, these bars (with oats and apples) also make a great sweet breakfast treat with a cup of coffee or tea.

Nutritional Breakdown (Approx. per serving)

(Based on 16 squares)

  • Calories: 260
  • Carbohydrates: 38g
  • Protein: 3g
  • Fat: 12g
  • Fiber: 2g
  • Sugar: 22g

Keep in mind, values vary depending on add-ins and portion sizes.

FAQs About Apple Crisp Bars

1. Can I use apple pie filling instead of fresh apples?
Yes! If you’re short on time, canned apple pie filling works as a shortcut. Just keep in mind it will be sweeter, so you might want to reduce the sugar in the crumb mixture.

2. What apples are best for baking?
Granny Smith, Honeycrisp, Fuji, and Braeburn are all excellent. A mix of tart and sweet is best.

3. Can I make these ahead for a party?
Absolutely! These bars taste even better the next day after the flavors have melded together. Make them a day in advance, refrigerate, and slice just before serving.

4. Can I double the recipe?
Yes, you can double it and bake in two pans. They freeze beautifully too, so leftovers won’t go to waste.

5. Do these bars need to be refrigerated?
Not immediately, but if you want them to last beyond 2 days, refrigeration is recommended.

Conclusion

There’s just something magical about desserts that combine simplicity with comfort, and these Easy Apple Crisp Bars are exactly that. With their buttery oat crust, juicy apple filling, and crumbly topping, they’re a treat that brings warmth and joy to any table.

Whether you bake them for a cozy weekend dessert, a holiday spread, or just to enjoy with your morning coffee, these bars are guaranteed to impress. And with so many ways to customize them, they’ll quickly become a go-to recipe in your kitchen.

So grab some apples, warm up the oven, and treat yourself to a pan of these delicious bars. Trust me—one bite, and you’ll know why this recipe belongs in your baking rotation. 🍎✨

Leave a Comment

Recipe Rating