
Step 1 – Preheat and Prep Your Baking Sheet
Start by preheating your oven to 375°F (190°C). Line a baking sheet with parchment paper—this makes cleanup effortless and prevents the biscuits from sticking. You’ll thank yourself later when you don’t have to scrub baked-on sugar!
This first step sets the stage for even baking and perfect browning. While your oven heats, you can prepare the filling. The goal here is to have everything ready to go so you can work quickly once the dough is flattened.
Step 2 – Create the Apple Cinnamon Filling
In a small mixing bowl, combine your chopped apple pie filling, brown sugar, ground cinnamon, and vanilla extract. Stir gently until everything is well-coated and smells absolutely divine.
You’ll notice the mixture becoming glossy and aromatic—the cinnamon infuses warmth, and the brown sugar melts slightly, creating that sticky-sweet apple pie texture we all love. If you like a stronger cinnamon flavor, feel free to add an extra pinch.
This filling is the heart of the recipe, so don’t rush it. Take a moment to appreciate the scent—it’s like bottled-up autumn! 🍎🍂
Step 3 – Flatten and Fill the Biscuits
Next, open your can of biscuit dough (brace yourself for the pop—it always surprises me!). Lightly flour your surface and flatten each biscuit into a 4-inch circle using your hands or a rolling pin.
Once flattened, place about 1 tablespoon of the apple mixture in the center of each biscuit. Be careful not to overfill, or the seams might burst during baking. Think of it like wrapping a small present—the tighter and neater, the better the result.
Fold the edges of each biscuit up and over the filling, then gently pinch to seal. Don’t worry if they’re not perfect; the magic happens in the oven when they puff up and turn golden brown.
Step 4 – Seal, Brush, and Bake
Once your biscuits are filled and sealed, place them seam-side down on the prepared baking sheet. This keeps the filling snug inside and prevents any sweet apple goodness from leaking out while baking.
Now, take your melted butter and brush it generously over the tops of each biscuit. This simple step makes a big difference—it helps them bake up golden, flaky, and beautifully glossy, just like the ones you’d find in a bakery window.
Pop them into your preheated oven and bake for 15–18 minutes, or until they’re a gorgeous golden brown and your kitchen smells like a cinnamon-scented dream. 🍎✨
As they bake, the apple filling becomes warm and gooey while the biscuit layers puff up, creating the most satisfying texture contrast—crispy on the outside, soft and buttery on the inside. You’ll know they’re done when the tops are lightly caramelized and the bottoms are crisp but not burnt.
Let them cool for about 5 minutes before glazing. Trust me, this short wait is worth it—you want that glaze to stick, not slide right off from the steam.
Step 5 – Mix and Drizzle the Sweet Glaze
While the biscuits cool slightly, it’s time to whip up that creamy vanilla glaze. In a small bowl, whisk together:
- ½ cup powdered sugar
- 1–2 tablespoons milk
- ½ teaspoon vanilla extract
Start with 1 tablespoon of milk and add more if needed to reach a smooth, drizzly consistency. The glaze should fall off the spoon slowly, like a ribbon.
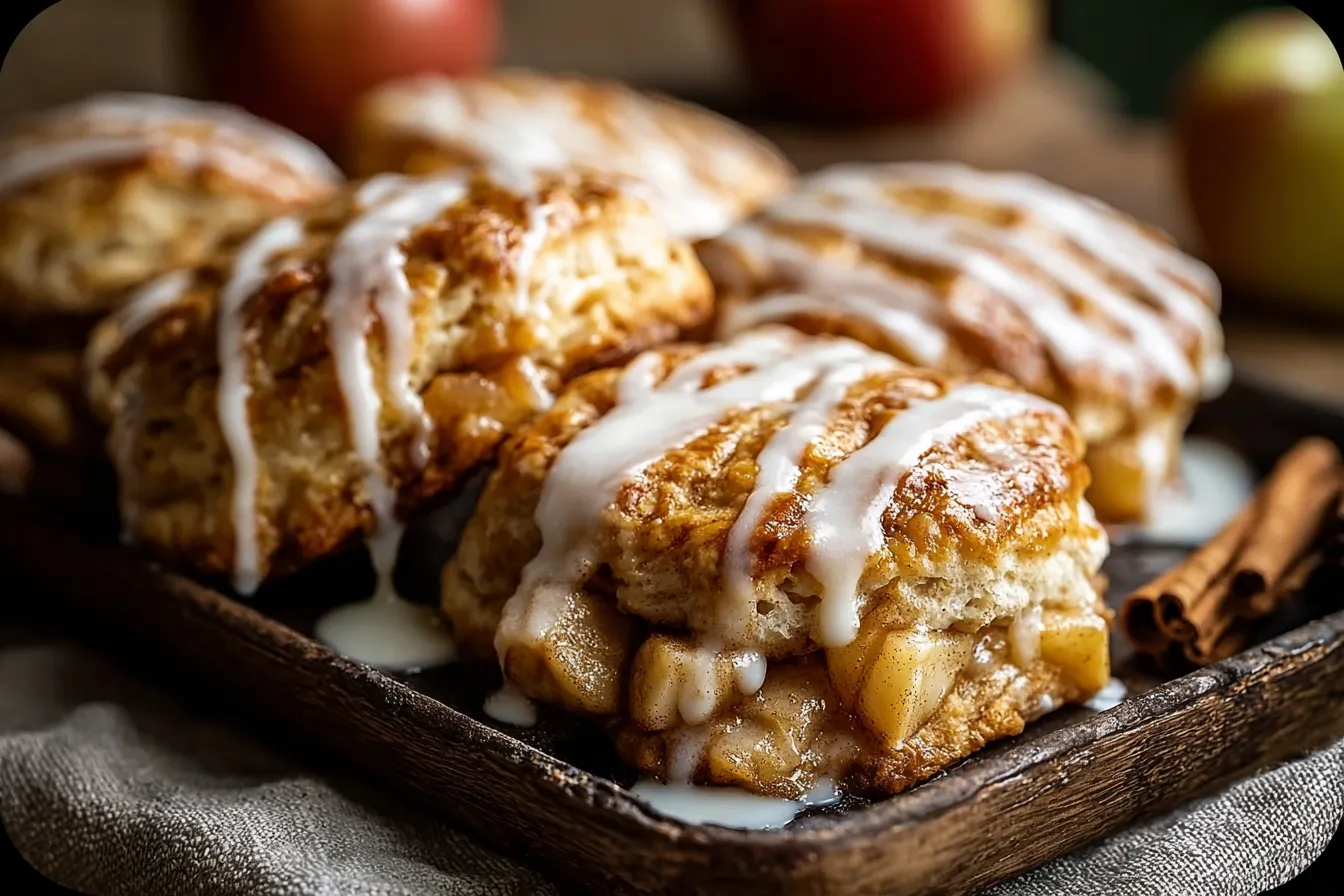
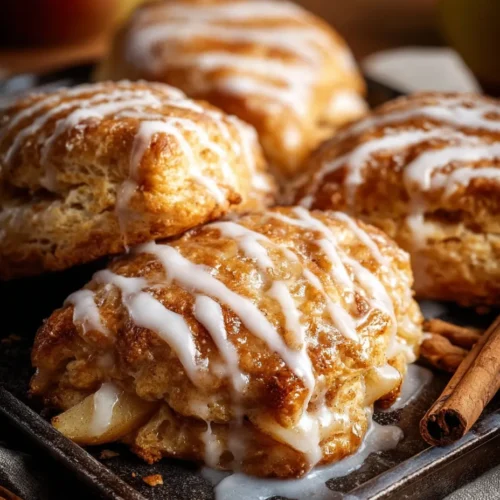
Once ready, drizzle it over the warm biscuits using a fork, spoon, or piping bag. Watch as the glaze melts slightly into the golden surface—creating those picture-perfect glossy streaks (just like in the image above). 😍
This glaze adds the final touch of sweetness that ties the whole dessert together. Every bite has that lovely combination of buttery biscuit, spiced apple filling, and silky vanilla icing.
You can serve them warm for the coziest experience—pair them with a steaming cup of coffee, chai tea, or a scoop of vanilla ice cream for dessert.
Tips for the Perfect Apple Pie Biscuits
Don’t Overfill the Biscuits
It’s tempting to load them with filling (I get it—apple pie filling is irresistible!), but adding too much can cause leaks during baking. Stick to about 1 tablespoon per biscuit. This ensures your biscuits bake evenly and hold their shape beautifully.
Use Fresh or Canned Apple Filling Smartly
Canned apple pie filling is a lifesaver for busy bakers, but if you want a fresher taste, you can make your own in minutes. Just sauté peeled, chopped apples with a bit of butter, brown sugar, and cinnamon until tender. Homemade or store-bought, just make sure the filling isn’t too wet—excess liquid can make your biscuits soggy.
Adjust the Sweetness to Your Taste
If you prefer a lighter sweetness, reduce the brown sugar or glaze. On the other hand, if you have a sweet tooth, drizzle a bit of caramel sauce on top for that “apple pie à la mode” flavor. 🍯
Remember, baking is about making it your own—taste as you go and trust your instincts.
You may read also :
Apple Cinnamon Loaf
Mini Pineapple Upside Down Cheesecakes
Easy Caramel Apple Dump Cake
Apple Pie Biscuits
Equipment
- Baking Sheet
- Parchment Paper
- Mixing Bowl
- Rolling Pin
Ingredients
Biscuit Dough
- 1 can (16.3 oz) refrigerated biscuit dough
Apple Filling
- 1 cup apple pie filling finely chopped
- 2 tbsp brown sugar
- 1 tsp ground cinnamon
- 0.5 tsp vanilla extract
- 1 tbsp butter melted, for brushing
Glaze
- 0.5 cup powdered sugar
- 1–2 tbsp milk
- 0.5 tsp vanilla extract for glaze
Instructions
- Preheat the oven to 375°F (190°C). Line a baking sheet with parchment paper for easy cleanup.
- Prepare the apple filling by mixing chopped apple pie filling with brown sugar, cinnamon, and vanilla extract.
- Flatten each biscuit into a 4-inch circle using your hands or a rolling pin. Lightly flour your surface to avoid sticking.
- Spoon about 1 tablespoon of filling into the center of each biscuit. Fold the edges over and pinch to seal. Don’t overfill.
- Place seam-side down on the prepared baking sheet. Brush the tops with melted butter for a golden, flaky finish.
- Bake for 15–18 minutes until golden brown and fragrant.
- Whisk powdered sugar, milk, and vanilla until smooth and drizzly to make the glaze.
- Cool the biscuits slightly, then drizzle with glaze before serving warm.
Notes
Healthier Twists You Can Try
While these Apple Pie Biscuits are undeniably indulgent, there are a few simple tweaks you can make to give them a healthier spin without sacrificing flavor.
Swap Sugar for Natural Sweeteners
Instead of brown sugar, try using coconut sugar, maple syrup, or honey for a more natural sweetness. These alternatives have lower glycemic indexes and add their own subtle flavor notes—honey adds floral depth, while maple syrup enhances that cozy fall vibe.
Try Whole Wheat or Low-Fat Dough Options
If you’re watching your carbs or looking for a fiber boost, use whole wheat biscuit dough or make a homemade dough using a mix of all-purpose and whole wheat flour. You can also opt for reduced-fat refrigerated dough—it still bakes up tender and golden but with fewer calories.
Add Nuts or Oats for Extra Texture
Want a bit of crunch? Sprinkle chopped walnuts or pecans into the apple filling before sealing the biscuits. Or, mix in a spoonful of rolled oats for a rustic touch. Both options add nutrients and a satisfying texture that pairs perfectly with the soft biscuits.
How to Serve and Enjoy Apple Pie Biscuits
Pair with Beverages for the Perfect Treat
These biscuits are delightfully versatile—they work just as well for breakfast as they do for dessert. Serve them warm with a cup of hot coffee, spiced chai, or even apple cider for the ultimate fall combo. ☕🍁
For a more indulgent treat, serve with a dollop of whipped cream or a scoop of vanilla ice cream. The cold creaminess paired with the warm, spiced biscuit is heavenly.
Turn Them into a Dessert Masterpiece
Want to impress guests? Stack two biscuits with a spoonful of apple filling in between, drizzle extra glaze on top, and sprinkle with cinnamon sugar. You’ve just created Apple Pie Biscuit Towers—a show-stopping dessert that looks fancy but takes minutes to make.
Or for brunch, pair them with crispy bacon and scrambled eggs—the sweet-savory combo is unbeatable!
How to Store and Reheat Apple Pie Biscuits
Storing at Room Temperature vs. Refrigeration
If you somehow have leftovers (good luck resisting them!), store them in an airtight container at room temperature for up to 2 days, or refrigerate for up to 5 days. The glaze will firm up a bit as it cools but softens again when warmed.
The Best Way to Reheat Without Drying Out
To bring them back to life, reheat in a microwave for 10–15 seconds or in a 350°F (175°C) oven for 5 minutes. Avoid overheating, as this can make the biscuits tough.
For an extra treat, brush a little melted butter on top before reheating—it refreshes the flavor and keeps the texture perfect.
Fun Variations to Try Next Time
Caramel Apple Pie Biscuits
Drizzle warm caramel sauce over the glaze for an extra layer of sweetness. You can even add a pinch of sea salt to the caramel for a salted caramel twist.
Maple Glazed Apple Pie Biscuits
Replace the vanilla extract in your glaze with pure maple syrup for a deeper, earthy sweetness that screams “fall comfort.”
Savory-Sweet Apple Cheddar Biscuits
For a bold twist, mix shredded sharp cheddar cheese into your biscuit dough before filling. The tangy cheese pairs beautifully with the sweet apple filling—an unforgettable balance of flavors!
Why These Biscuits Are a Crowd Favorite
Perfect for Holidays, Brunch, or Gifting
These Apple Pie Biscuits are perfect for Thanksgiving breakfasts, cozy family brunches, or even edible holiday gifts. Wrap them in parchment paper and tie them with a ribbon—they make a thoughtful homemade treat for friends or neighbors.
Kid-Friendly and Beginner Approved
Because the recipe uses simple, ready-made ingredients, it’s ideal for baking with kids or if you’re new to the kitchen. Kids love helping with the filling and glazing, and you’ll love seeing their faces light up when they taste their creations.
Conclusion – Cozy Up with Every Bite
These Apple Pie Biscuits are everything you love about fall wrapped into one warm, golden, flaky bite. They’re simple, comforting, and bursting with cinnamon-spiced apple goodness. Whether you serve them for breakfast with coffee, as an after-dinner dessert, or a late-night snack, they’re guaranteed to bring warmth and smiles to your table.
Every bite feels like a little hug from autumn itself—sweet, cozy, and perfectly nostalgic. 🍎🥧✨
So preheat that oven, grab your biscuit dough, and get ready to fill your home with the smell of happiness. Your taste buds will thank you.
Similar recipes : Baby Caramel Pecan Impossible Pies – Tiny Bites of Heaven
FAQs
1. Can I use homemade biscuit dough instead of canned?
Absolutely! Homemade dough works great. Just make sure it’s rolled out to about ½-inch thickness before filling.
2. What kind of apples work best for this recipe?
If you’re making your own filling, go for apples like Honeycrisp, Fuji, or Granny Smith for the perfect mix of sweet and tart.
3. How do I prevent the filling from leaking out?
Be sure not to overfill, and pinch the seams tightly. Placing biscuits seam-side down also helps keep everything inside.
4. Can I freeze Apple Pie Biscuits for later?
Yes! Bake them, let them cool completely, and freeze in an airtight bag. Reheat in the oven at 350°F until warm.
5. What’s the best way to make them vegan?
Use a plant-based biscuit dough, vegan butter, and non-dairy milk for the glaze. They’ll still turn out delicious!